November 24, 2016

Vegan Carob Cake Recipe


Truth be told, I hadn't baked in a while, let alone taking pictures of my creations or blogging about it! I feel like recently all I have time to do is cook proper meals, since to be honest, having to cook breakfast, lunch and dinner every single day for two and a half doesn't leave you much spare time!

A couple weeks ago, we treated one of our friends to a vegan cooking class for her 30th birthday, and it was such a fun experience! The dessert was a carob brownie, which inspired me to cook this vegan carob cake this week. 


For those of you not familiar with carob, it's a healthy alternative to chocolate because it's naturally sweet, high in fiber, low in fat, has twice the amount of calcium compared to cocoa and, most importantly specially for kids or caffeine-sensitive people, it doesn't have caffeine.

I got the recipe from here (in Spanish), and it's SO GOOD! I feel like next time I want to go cocoa-free the whole way though, because this recipe has a bit of chocolate in it.


You know I'm a huge chocolate lover, but this doesn't mean I don't have a major crush on carob ever since I first tasted it a couple weeks ago. Some people dislike it because, obviously, it will never taste 100% like chocolate, but I simply love it. It's slightly different yet totally mesmerizing. 

So without much ado, here comes the recipe!

VEGAN CAROB BANANA CAKE

  • 2 or 3 over-ripe bananas
  • 1 and 1/2 cups of spelt flour
  • 1/2 cup of carob flour
  • 1 cup of chopped walnuts
  • 1/2 cup of olive oil
  • 2 spoons of pure unsweetened cocoa
  • 1/2 spoon of ground cinnamon
  • 2 spoons of baking powder
  • 1/2 cup of brown sugar
  • 1 cup of oat milk
  1. Blend the bananas, sugar, oat milk and olive oil together.
  2. On a separate bowl, mix the spelt flour, carob flour, baking powder, cocoa and cinnamon.
  3. Gently place the dry mixture on the liquid batter and keep folding until blended. Fold in 1/2 1/2 cup of chopped walnuts.
  4. Pour the mixture into a pound cake pan or any other baking dish of your preference.
  5. Last but not least, distribute the remaining 1/2 of chopped walnuts on top of the batter so as to create a nice coat.
  6. Bake for 50-60 minutes at 170C.
TIP: This recipe will be even healthier if you use 1 cup of dates or 1/2 of molasses instead of the sugar. 


***********

RECETA EN ESPAÑOL

BIZCOCHO DE ALGARROBA VEGANO

                                                        2 o 3 plĂĄtanos maduros

1 taza y 1/2 de harina de espelta

1/2 taza de harina de algarroba

1 taza de nueces picadas

1/2 taza de aceite de oliva

2 cucharadas de cacao puro en polvo
1/2 cucharada de canela en polvo
2 cucharadas de levadura
1/2 taza de azĂșcar moreno
1 taza de leche de avena


               - Bate en un bol los plĂĄtanos, el azĂșcar, la leche de avena y el aceite de oliva.

- En otro bol, mezcla la harina de espelta, la harina de algarroba, la levadura, el cacao y la canela.

- Incoropora la mezcla del punto nĂșmero 2 al bol del punto nĂșmero 1 con movimientos envolventes hasta que estĂ© bien integrado. Añade 1/2 taza de nueces y integra suavemente.

- Pon la mezcla en un molde y esparce el resto de las nueces por encima.

- Hornea a 170C durante 50-60 minutos. 

NOTA: Puedes sustituir el azĂșcar por 1 taza de dĂĄtiles o 1/2 taza de melaza.

I hope you like it as much as we did. Thanks for reading!!! 


June 8, 2015

Chocolate Guinness Cake with Mascarpone Frosting


Liam turned 9 months on May 28th. As I mentioned on my Instagram account, I'm not one for big monthiversary celebrations, yet 9 months truly is something. As you may know, human babies are, among all mammals, the ones born more immature. According to the exterogestation theory, babies are not considered as having achieved full gestation until 9 months after birth, when their brain has doubled from birth and they start to crawl. For me it was just something sentimental, 9 months of pregnancy and 9 months since Liam was born. This makes a year and a half of my life revolving around Liam and counting! <3 Also, this may be TMI but I got my period back after a year and half when Liam was 9 months and 1 day! This means my body is ready for another baby =D  


I decided to bake a cake and celebrate Liam's 9 months with a nice lunch with my family, even though Liam didn't get to eat any cake, of course!


I baked the Chocolate Guinness Cake following the recipe I found on Nigella's blog. I made a couple small adjustments though.1. The most important one was instead of buying cream cheese I accidentally bought Mascarpone, so I used that for my frosting instead of the cream cheese. 2. For the cake, I cut down on the sugar from 400g to 300g. 

chocolate guinness cake with mascarpone frosting

This cake turned out pretty tall and big for just 5 of us, we couldn't finish it all! I'd use half the ingredients if I ever had to bake it again. Besides this, the result was delish. Everyone absolutely loved it. It was pretty easy to bake, too! Another perfect cake to add to my sweet recipes!


April 22, 2015

Lemon Meringue Pie


During the Easter holidays I finally got to spare some time to bake something yummy. One of J's favorite desserts is the Lemon Meringue Pie, so it was settled. 

Lemon pie before adding the meringue

I had baked lemon tarts previously, as you may recall, so it was basically the same thing plus the meringue. Last time I bought the ready-to-fill tartalette shells, but this time I made the base myself. There's a more complicated way of doing this dough, but I went for the also delicious and 100 times faster version. I just crashed some digestive cookies and mixed them with a bit of melted butter until blended together in the form of a wet paste. For the lemon curd recipe, you can check my lemon tart recipe, and the meringue doesn't really need much of an explanation. 

You can pull up points on the meringue with the back of a spoon for a prettier look

It was SO delicious my husband congratulated me for a whole day. I feel like it turned out really pretty, too, don't you think?

You need to put the cake in the oven for a couple minutes to get this roasted effect on the meringue


December 17, 2013

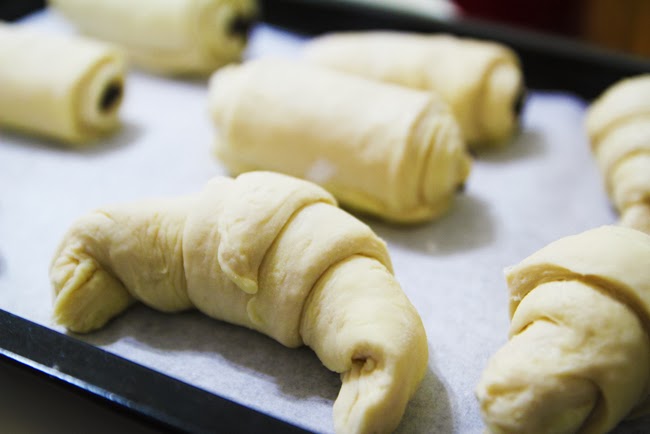
Homemade Croissants and Pains au Chocolat

Baking croissants

I made it! I accomplished the most difficult pastry I've ever attempted to bake: croissants and pains au chocolat. The result was delicious!

After making the lemon tart, one of my all-time favorite desserts, I decided I wanted to attempt one of my favorite viennoiseries, one of my top choices for breakfast: pains au chocolat, which is just like a chocolate croissant, except with a roll shape. The dough for the pains au chocolat and the croissants is prepared in the exact same way, so I finally decided to bake some croissants as well, just because their shape is cuter :) I used this video recipe from Baking with Julia (prominent Julia Child that is). For these kind of really elaborated recipes, I think a video recipe is the way to go, because it leaves no room for doubts as sometimes happens with written recipes.

Homemade croissant

Homemade pain au chocolat

It took me a total of almost 2 days from the very first step to the very last, so you'll understand after so much effort how bad I wanted these pastries to come out great!!! Well, they did. Once again, I'm proud of myself! Thanks to my lovely husband who helped me shape the croissants and pains au chocolat. And special thanks as well to Maison Eric Kayser, one of my favorite bakeries in town, who agreed to sell me some special chocolate bars for the pains au chocolat.

The layered dough is a sign of work well done!

This recipe yielded 8 pains au chocolat and 6 croissants, most of them slightly smaller than the ones you'd find in a bakery. I baked some of them and froze the rest, and now we can have fresh croissants every morning! :) Will you give it a try?


December 9, 2013

Homemade Pierre Hermé Lemon Tart - Recipe


There was a before and after in my baking skills last Friday night. On Friday, J's cousin's wife and her friend, from mainland China, came to Hong Kong for some crazy shopping. My mother in law and I spent de day with them and brought them all around Hong Kong to my favorite shopping places. By the way, if I ever decide to make a post with all of these places, Hong Kong girls and Hong Kong tourists alike will love me, you just can't find better! Anyway, we had a really wonderful time, between shopping and my mother in law's praises on my baking skills. I think if any of my friends back home in Barcelona saw me out and about with three Chinese women speaking Chinese as if it were my mother tongue, it would blow their minds off. It kinda blows my own mind too when I stop to think about it, really. Not to boast or anything, but my Cantonese is definitely proficient by now. So back to the baking stuff, they were so curious about my homemade cakes that when I finally got home on Friday night, I decided I would try to make one of my all-time favorite desserts: a lemon tart. Not any kind of lemon tart, to be sure! I used Pierre Herme's recipe, and l can vow it turned out EXACTLY as the one he sells for 4.5 euros per tart! Now is when I really boast: I AM A GENIUS!!! 


I followed the recipe in French from this blog because it has awesome step-by-step images, which is why even if you don't speak French, I still recommend taking a look for the pictures sake.

I know if you have read my whole post, at this point you're dying to try to make these amazing lemon tarts yourself. I won't keep you waiting! Here goes the recipe.


Pierre HermĂ©'s Lemon Tart recipe, adapted from his recipe book Desserts by Pierre HermĂ© 
Pùte Sucrée:
- 300g unsalted butter, cubed, at room temperature- 190g powdered sugar- 60g ground almonds- 1 vanilla bean, scrapped- 2 eggs, room temperature- 500g all-purpose flour- 1 tsp salt 
Put the butter in a mixer bowl and beat until smooth and creamy. Add the sugar, ground almonds, and vanilla bean seeds. Mix until well combined.Add the eggs one at a time. Be sure the first egg is fully incorporated before adding the next one!Combine the flour and salt. Add to the dough in about three parts. Mix until just it comes together. Attention here: Be very careful and for any reason Do not overwork the dough!It’s better to have a lumpy dough rather than a overworked one.Divide the dough in the portions you need. (I did 2 big tarts for 8 persons)Turn each part into a disk and wrap them with plastic wrap and store in the fridge overnight.Next day, remove the dough from the fridge, and roll it between two sheets of parchment paper. Work quickly…like that the dough will stay manageable and not soft and overworked.Line your tart pan with the dough and put it back in the fridge for at least 1 hrs to rest.Preheat the oven to180°CBake for 20 minutes until it’s golden brown.Let cool in the tart pan. 
Lemon curd:
{Makes about 800ml}- 4 lemons (zest and juice)- 4 large eggs- 300g unsalted butter cut into large cubes and softened- 240g caster sugar  
Bring a saucepan of water to the simmer. In the meantime, set up your food processor/blender or have a deep container and your immersion/stick blender ready to go. Also prepare a sieve that will fit over your food processor or chosen container.Combine the sugar and lemon zest in a metal bowl that will fit over the simmering pan of water without its base touching the water (basically, you should be cooking the curd in a bain marie). Rub the sugar and zest together with your fingers until the mixture is moist, grainy and incredibly aromatic. Then whisk in the eggs followed by the lemon juice.Place the bowl into your pan of simmering water. Keep whisking until the cream thickens and reaches 82° Celsius. Pull the curd off the heat the second it hits 82° Celsius and sieve it into your food processor/blender or container. Let it cool to 60° Celsius.Blend on high while adding pieces of butter into the cream, about 5 pieces at a time. Scrape down the sides of the bowl when necessary. When all the butter has been incorporated, continue to blend for another 3 to 4 minutes to ensure that it is perfectly smooth and light.The curd can be used immediately, stored refrigerated in an airtight jar for up to 4 days, or frozen for a month. I found out the curd is at its best after being in the refrigerator overnight. That's when it gets the perfect consistency and even stronger flavor.


Important personal notes on this recipe:


1. The cookie base: Ok, I cheated a bit. But this was my first time ever to do a tart/pie, so I have never done pĂąte sucrĂ©es ever! So I bought my tartlets from the supermarket... ready to fill. 
2. The lemon curd: I used half the amount for all the ingredients in the recipe, and it yielded enough curd for 5 individual 6.5cm tarts. I mentioned how this recipe is sort of pro because we need a thermometer for it... Well, my thermometer didn't help much. I spent 20 minutes removing my mixture in the bain marie, and the temperature wouldn't go higher than 55°C. I was starting to panic and I finally stopped the bain marie and put the whole thing in the fire, where it didn't get to 82°C either, but 77°C. I stopped it nonetheless because the mixture was drying out and it I was sure it would get burned any second now. I took it out from the stove and 30 seconds later I added the butter. And guess what, the result was PERFECT. I sort of couldn't believe it turned out so great. I'm a lemon tart lover so I've tried MANY lemon tarts in my life... and this was just as good as Pierre HermĂ©'s one. He supposedly uses Meyer lemons, which are sweeter and not as sour, but I promise you this recipe works wonders with normal lemons too.


I've mentioned in other posts that I love baking and eating my cakes, but I think what I enjoy most of all is styling them for pics. These pictures I'm sharing today are of the tarts I prepared for J's cousin's wife and her friend on Saturday morning. The previous night, right after I finished them, J and I had a tart each as well, and I styled them in a different way that wasn't 100% to my liking. But then that night on bed I pictured this simple yet perfect styling in my mind, and so here is the result! I actually get sooo much inspiration on bed before falling asleep. I kind of envy J because he falls asleep the second we say good night, and I stay awake for an hour on average every night, but I've come to like these moments in which I don't have anything to interfere with my thoughts, and my brain seems to reach some sort of nirvana of inspirations. There's another place where this happens: the shower. Although I get more inspiring thoughts on bed than in the shower, probably because of the amount of time I spend in each of the two. During my first college degree in Barcelona, I always had major outfit inspiration on bed before falling asleep. Then I woke up knowing exactly what perfect outfit to wear, except that sometimes the perfect skirt for the perfect outfit wasn't clean and then SOS panic attack all over the house. Oh well, enough babbling for today :)


December 2, 2013

Snickers Cupcakes Recipe


It was the hubby's birthday yesterday and I was planning on making a cake, but he said he didn't want me to spend time in the kitchen on the weekend which is when we actually get to do things together. So I decided I would bake something today, since we were going to the in-laws' to celebrate the birthday. For some reason I decided I would be baking cupcakes instead of the traditional cake. Lots of birthdays nowadays are celebrated with cupcakes, even weddings have cupcake towers instead of a wedding cake, so why not! I immediately knew which recipe to go for, the one Alma ObregĂłn, one of my favorite bakers, made for her 29th birthday. Alma's website, Objetivo Cupcake Perfecto, is a must if you speak Spanish and like to bake. Her recipes are absolutely amazing, none of them have ever let me down.

These particular cupcakes turned out so great I almost cried. They are definitely the best cupcakes I've ever baked, and they are totally at cupcake-shop level! I'm so proud!!! I made them with lots of love because they were for J's birthday, so this plus the perfect recipe made for the PERFECT cupcakes! Woohoo!


These cupcakes are made with chocolate and Snickers, the chocolate bar with peanuts and caramel, so the result is a chocolate-peanut-caramel gift from heaven. I couldn't just post all these lovely pics and then leave the ones who don't speak Spanish without the chance to try them out, so here goes the translation of the recipe!


Yields 12 cupcakes:

• 60 ml light olive oil
• 170 g sugar
• 115 g flour
• 50 g of cocoa powder

• 3 tablespoon of peanut butter

• 1.5 teaspoon baking powder

• 1 egg

• 75 ml of milk
• 1 teaspoon vanilla extract
• 75 ml of boiling water
• 8 snickers diced (For easier cutting , put them in the refrigerator 30 minutes before)

For the icing:

• 6 tablespoons peanut butter
• 200g butter at room temperature
• 200g icing sugar
• 150g dark chocolate melted and and room temperature

Preheat oven to 180 CÂș. Prepare the cupcake tins.

In a bowl, sift flour, cocoa and baking powder. Reserve. Mix olive oil, sugar and eggs until fully integrated. Add the peanut butter. Incorporate the flour mixture and cocoa. Once the mixture is homogeneous , incorporate the milk and vanilla and beat again. Finally pour the water, freshly boiled . Beat again. Throw into the mixture the chopped snickers .

Put the mix into the tins. Bake for 20 minutes or until you insert a toothpick and comes out clean.

To make the icing, sift the icing sugar and beat in the butter . First, one minute at low speed and then five minutes (minimum) at maximum speed, or until the mixture is whiter and has gained volume. Add the 100g melted chocolate and beat two or three minutes. Add the peanut butter and beat for another minute.

Once the cupcakes have completely cooled down, decorate them with a piping bag, from the outside toward the center, clockwise.


Please do let me know how you like the cupcakes if you try the recipe, I hope you love them as much as we did!!! In my opinion, there were too many snickers. Next time I'd rather go with half. I'm looking forward to try this recipe with Twix instead of Snickers. Twix is my favorite chocolate bar EVER!!!


August 11, 2013

The Joy of Baking

You may have noticed that all sorts of homemade cakes have invaded my facebook page and my instagram account this past week. You may have thought I was in a crazy sweet tooth frenzy... Well, don't worry, what happened is I got a new oven! The oven I had before was way too small to bake any cakes in it, so I've been so excited this last ten days with my new oven, I've made five different kinds of cakes.


The first thing I baked were these cute vanilla cupcakes. I used the Vanilla Cupcakes recipe from BBC. They were very easy to make and I was really pleased with the result! I used one single drop of red coloring on the buttercream icing to get the pink. Then I made some hearts with fabric tape for the perfect girlie touch.


My second creation were these AMAZING brownies. This was my favorite cake out of the 5 I made this week. You need to know that I was totally obsessed with Mrs. Fields brownies until the second I got these brownies above into my mouth. They are the MOST DELICIOUS brownies EVER EVER EVER! I used Good Food's Best-ever brownies recipe, and all I can say is there couldn't be a better name for this recipe! DEFINITELY best-ever brownies! I totally recommend you try this out.


Thirdly, I baked some more vanilla cupcakes using the same recipe as for the first ones. I basically just wanted to try new cupcake decorations here, because I bought these silver sugar pearls and these pink chocolate blossoms and couldn't wait to use them! I think this pink chocolate is so pretty, it's perfect for romantic cakes.


My fourth creation was a Green Tea Pound Cake! I used too little quantity for my big cake mold so I ended up with a super low cake, but it was still yummy! This is a cake I'm looking forward to make again at the right height. You know my weakness for green tea! I used Food.com Green Tea Pound Cake recipe.


Finally, I made a cake for J mom's birthday on the 8th of August. Today the 11th of August is my own mom's birthday, I sooo wish I could bake a cake for her too :( {Yes, J's mom is only 3 days older than my mom, they're both from the same year!}
This cake was a Jasmine tea cake with white chocolate ganache. I made cake from a jasmine tea cake pre-mix, and the white ganache from Food.com's recipe.

I hope you enjoyed seeing what I've been up to these last few days when I wasn't busy with my online shop Frill Me :)


April 19, 2013

Baking in Hong Kong


I really like baking, it's the best thing one can do in a kitchen! Cooking for dinner is nice too, but it can never be as fun as baking cakes! Here in Hong Kong I only have a tiny toaster-oven that burned every single cake I tried to bake in it. Not having a big and properly furnished kitchen with a good oven is probably the thing I like the least about my appartment. I miss baking!!! That's why I was so desperate to bake anything at all when I went back home to Barcelona at the beginning of the month. My mom and I cooked this easy chocolate cake and brown sugar heart-shapped muffins. They were fun to make and yummy to eat! Seriously, I need to buy an oven!


Have a marvelous weekend! Follow me on instagram to see what I'm up to!